Friday 28 October 2016

Ghost Fashions


It is almost Halloween and I see lots of Ghost Fashions reposts without crediting it back to the sketch artist on Instagram.  I tried to search, and found it!!

This cute Ghost Fashions sketch created by Gemma Correll.


This inspired me to make edible version of them LOL


Start with cake balls.
These are vanilla cake with cream cheese buttercream.
Shaped and freezed them.
Melt some white chocolate, then roll 1 by 1 in it.
Into the freezer until set.


There is 1 in the sketch called 'Ra - Ra'
I made this 1 into the largest one... Ruffle Ghost.
Start with large bell shape styrofoam,
cover them with fondant ruffles from the bottom,
the last 1/3 I use round shape fondant,
frill the edges and cover the top to about 1/3 of it.

Sorry, I didn't take more photo of it.

I never use this styrofoam shape before and it gets me thinking that I can make dresses with this,
or the bottom of the dress (from waist down), will be beautiful.
Maybe I give it a try one day.


Here are the finished products of Ghost Fashions:

peplum - two piece (LOL) - Reverse


slim fit - pleated - formal - empire line


sporty - distressed - empire line


and here are all of them (I didn't make all 16 like in the sketch)
HAPPY HALLOWEEN 2016!!


Thank you for looking >*.*<

Thursday 27 October 2016

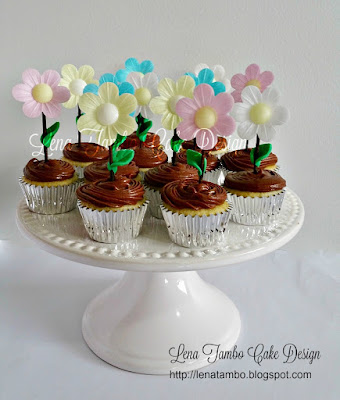
Mini Flower Pots Cupcakes


I found this package of daisy wafer paper on my local supermarket.  

Pretty!!


Then when I searched for something on the interest, I came across The Gunny Sack's flower pot cookies.  That inspired me to make Mini Flower Pots Cupcakes.

I baked my mini cupcakes and chocolate ganache.


The I prepare the flowers.
You need cocktail sticks, brown colored floral tape,
scissors, wafer paper daisies, little bit of water as "glue".


Start with a cocktail stick.
Dab a little bit of water on cocktail stick.
Wrap floral tape around it.
Stick it at the back of the flower.
Done.
Do this until all 12 flowers are finished.


Make the leaves.
I use smallest teardrop or petal cutter for this.


Not on the photo:
use cocktail stick to mark each of them,
make it look like they have "leaves bones".

Then joined them on the round edges,
so they will look like the above.
Use a dab of water around the round edges
stick them on flower stems.


Can you see the indentation on leaves?
Finished product (smile!)


Thank you for reading (^_^)


Monday 24 October 2016

How to pack sugar flowers to the Venue


This is how i pack my sugar flowers to the venue.
I use cupcakes box for roses, place something soft like tissue underneath each of them
functioned as their "cushions".


This is what they look like, once the box is full.


For larger flowers, I use regular boxes,
put lots of peanut styrofoams at the bottom,
some foams too, all functioned as "cushioned".


For this bunch, again I used cupcakes box with foam underneath them.


Thank you for reading  (^_^)

Saturday 8 October 2016

Homemade Sugar Lace for Cake Decorating


Sugar Lace has been popular for awhile.
They are pretty on cakes, cupcakes or even cookies.

In the past I did have a look at pre-made icing and mats,
honestly for me they are very expensive.
Not only because my business is a micro one,
also on pricing the cake, how much do I have to charge if I used them?
Since I never get any request for it, I never bother to buy.

Last week I came across Baking Savvy youtube cannel,
in this video you will see it only need 3 ingredients.
Interesting!  So I gave it a try.

Here is the BakingSavvy youtube video:

Thank you for sharing the recipe, Baking Savvy!! 


I put 1 Tbsp of Tylose first into Pyrex bowl,
then add 1/4 Cup boiling water into it,
mix mix mix.
It didn't take much time before everything comes together,
tylose dissolved, no lumps.


Then I put 1/4 Cup of "Queen" brand Royal Icing Mix into my mixer bowl,
then add tylose mixture into it, I beat it using hand mixer for about 7 minutes,
actually the mixture is already white but I just want to make it look whiter so I add Americolor Bright White into it, then mix again for another 3 minutes.
This is the result.  It looked good!  It works!


Then I spread them on lace mat and non-lace moulds.
Because I made it at night time, I left them overnight to set.
Btw I did re-coat the green mat once again since there were some uncovered "dots".


Here are the results:
 If I were to do it again on lace mat, I would re-coat all of them twice.
Some rounds were off the mat, those were thinner coat.
They do look pretty.  Feels stretchy and rubbery texture at this stage.


 From 'Happy Birthday' mould and feather mould.


 From alphabet bunting and small bow moulds.

From crowns mould.


I decided to leave feathers and bows on cool light windy area for overnight, they hardened up but not as hard as gumpaste, and colored them with shimmer/lustre dust mixed with alcohol.

Still look pretty.  


As for the lace pattern ones, I put 1 into a baking paper, then another on top of paper towel like so:


then stacked them together, fold the baking paper.
They hardened up just a little bit but still stretchy.
In the video, it says just put a little bit of water to bring them back to "life" again.


This much left.


What I would like to share is that this recipe works.
So give it a try {smile).


Thank you for reading...Hope y'all have a great weekend!
>^_^<


Thursday 6 October 2016

Halloween Cupcakes


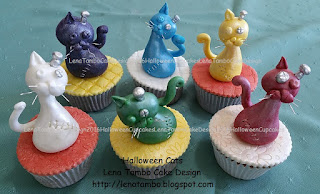
Made these colorful halloween cats.
The tutorial was from Kara Couture Cakes,
you can see it here.

She made black cat, elegant eventhough it's a Steampunk Kitty :)


To complete them, I also made:


 Pumpkin...I think it's not a scary one.


 Witch hat with white bow.
It was dusted with rainbow disco dust.
Can't see it on the photo.


Long pointy Orange color Witch Shoes
with edible glitter.
The inspiration came from Traditional Dutch shoes which my Uncle brought us as a gift when we were still children.  Those shoes were not pointy though.
Unlike the usual witch with black ugly shoes,
I think this particular witch must be quite trendy one {smile}.


This halloween cat....it stand out from the others because it look kind of "perfect", but be careful it is not as sweet as it look.  It resembles how us human may have 2 eyes, 2 arms, 2 legs etc, but be careful some of them are very evil in their acts.


Fat Bat.
This is my favorite out of all.
It has cute fat body with big funny googly eyes but small wings.
I bet it can't fly,,,, too fat!! {laugh}.


Here are all of them.


Happy Halloween 2016.

Happy Fall to my American Friends.

Happy Spring to my Australian Friends.

**Stay safe and Thank You for Reading**